Jotting down notes for myself, as this is the third year in a row our furnace has failed during freezing weather. My wife and I finally took the time to solve the riddles on our own.
Disclaimer: Use this information at your own risk! I am not an HVAC technician, and have no HVAC training. Information below is for my own personal record, and must not be considered advice. A furnace is an extremely dangerous device. If you do not fully understand what you are doing, please hire an expert.
Symptoms: No heat from Trane XR90 furnace, despite the blower running (i.e., cold air from vents).
The Trane status LED gives an error code of 4 flashes (Over Temperature Limit Circuit), or 3 flashes (Venting problem).
The furnace may intermittently produce heat, only to fail again throughout the day. My wife has been known to call the local HVAC repair company when the house drops into the low 60s; the furnace then makes her feel silly when the tech arrives and the temperature is rising.
Cause: Frozen combustion intake pipe, resulting from too much moisture in the vicinity during freezing temperatures.
Beneath our deck, the combustion intake is on the far left, exhaust is a few inches to the right, and our dryer exhaust is mounted barely more than 1ft to the right, separated only by a deck joist. I’m not sure who the previous homeowner hired. This is not how to do it, folks:
The above picture was taken in the morning, after I cleared the furnace intake for the second time in 12 hours. Moisture particles adhere to the cold intake and build a frosty ball within a matter of hours while we do laundry:
We’ll be moving the dryer exhaust vent and installing a concentric vent for the furnace soon.
Solutions
1) Start by checking and clearing all frost from the intake with a crowbar or similar tool.
If the XR90 status LED is flashing 3x, it will detect that its intake has been restored, and the furnace will fire up again.
2) If the XR90 is flashing 4x, it’s probably been cycling on and off for hours while the intake cycled between acceptable and unacceptable. Condensation and clogged intakes wreak havoc.
Open the main furnace panel and check the condensation drain trap and drain tubes. If any tubes are full of water or debris, detach them and manually clear the water blockage (blow in the tube).
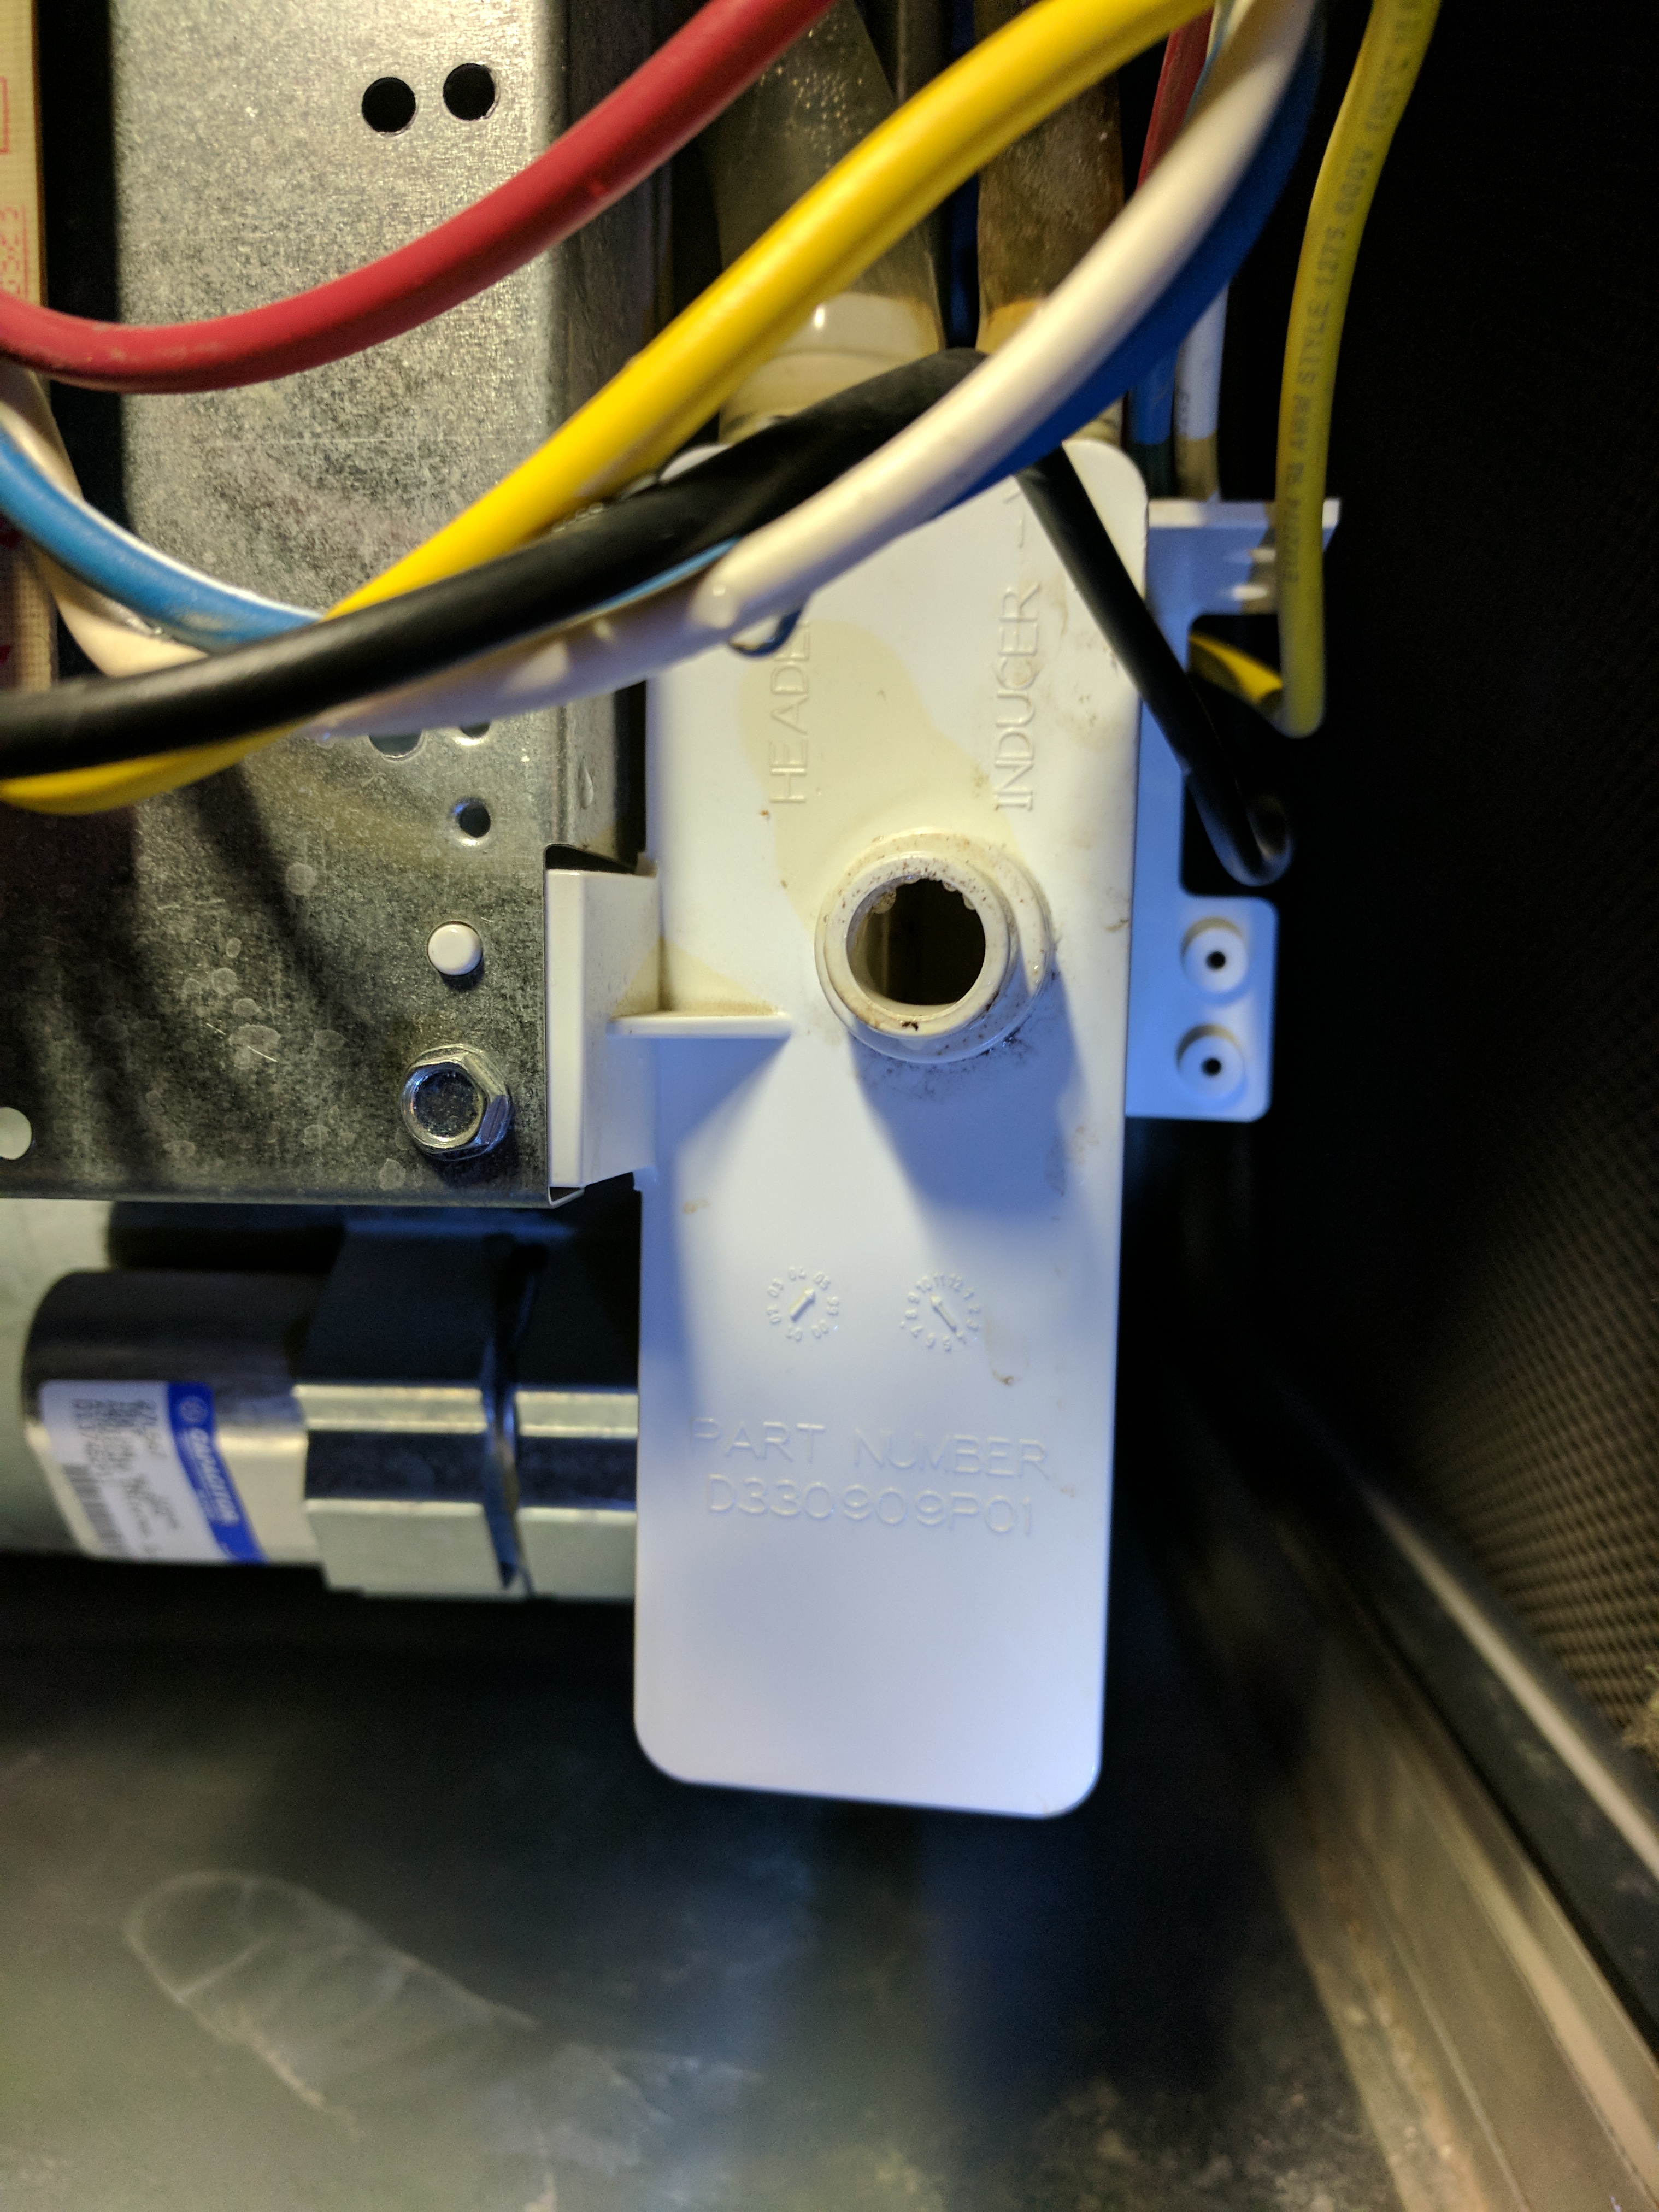
After the second clogged intake today, our condensation drain tube was full, and once again, the installers left a gift: the tube was mounted such that it lacked sufficient gravity to drain more than a trickle of water.
Securely reattach drain tubes and lock into place. Water in the furnace is bad.
3) Four flashes can also indicate a tripped safety limit switch. Remove the upper furnace panel to access the combustion area. Three screws hold a windowed panel to protect from the burners. Remove these three screws and inspect the combustion chamber. Is it free of condensation? Clean as needed.
If rust is present, call a technician for a safety inspection of the system and heat exchanger.
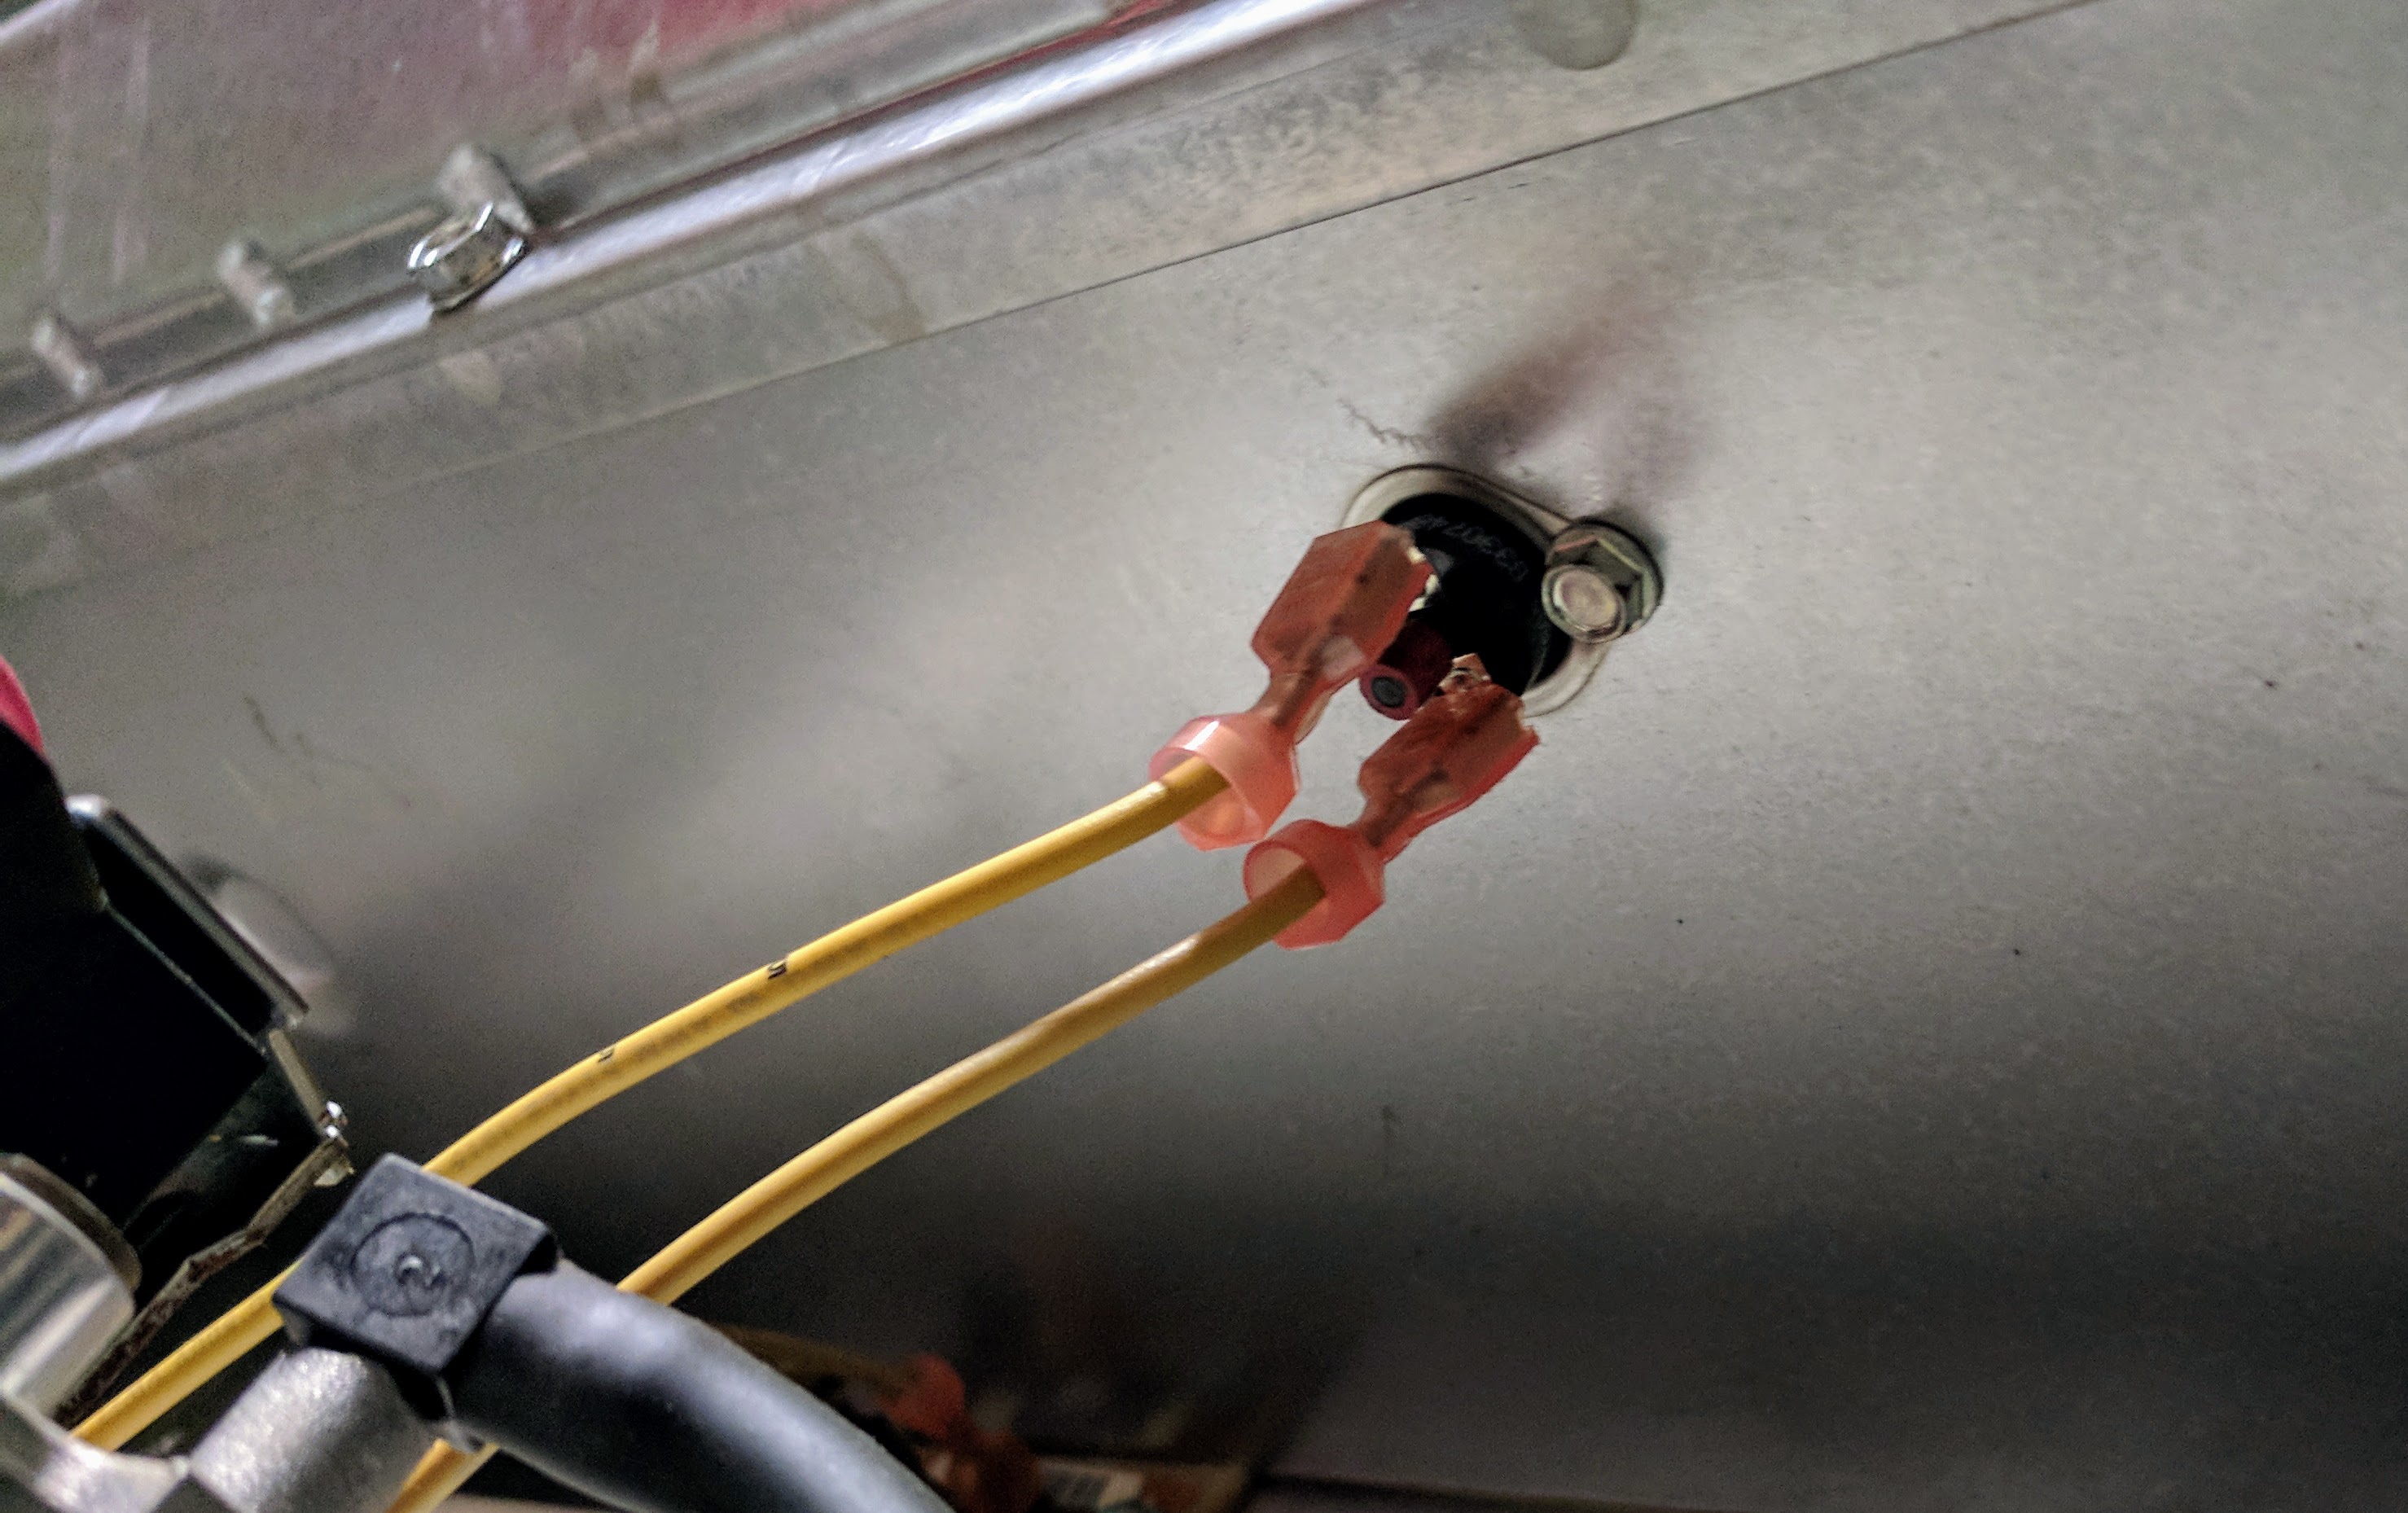
Only after ensuring that the combustion chamber is clean, and the intake vent is clear, and the condensation drain tubes are clear, reset the limit switch mounted beneath the combustion window. There’s a button centered between the two wires attaching to the switch:
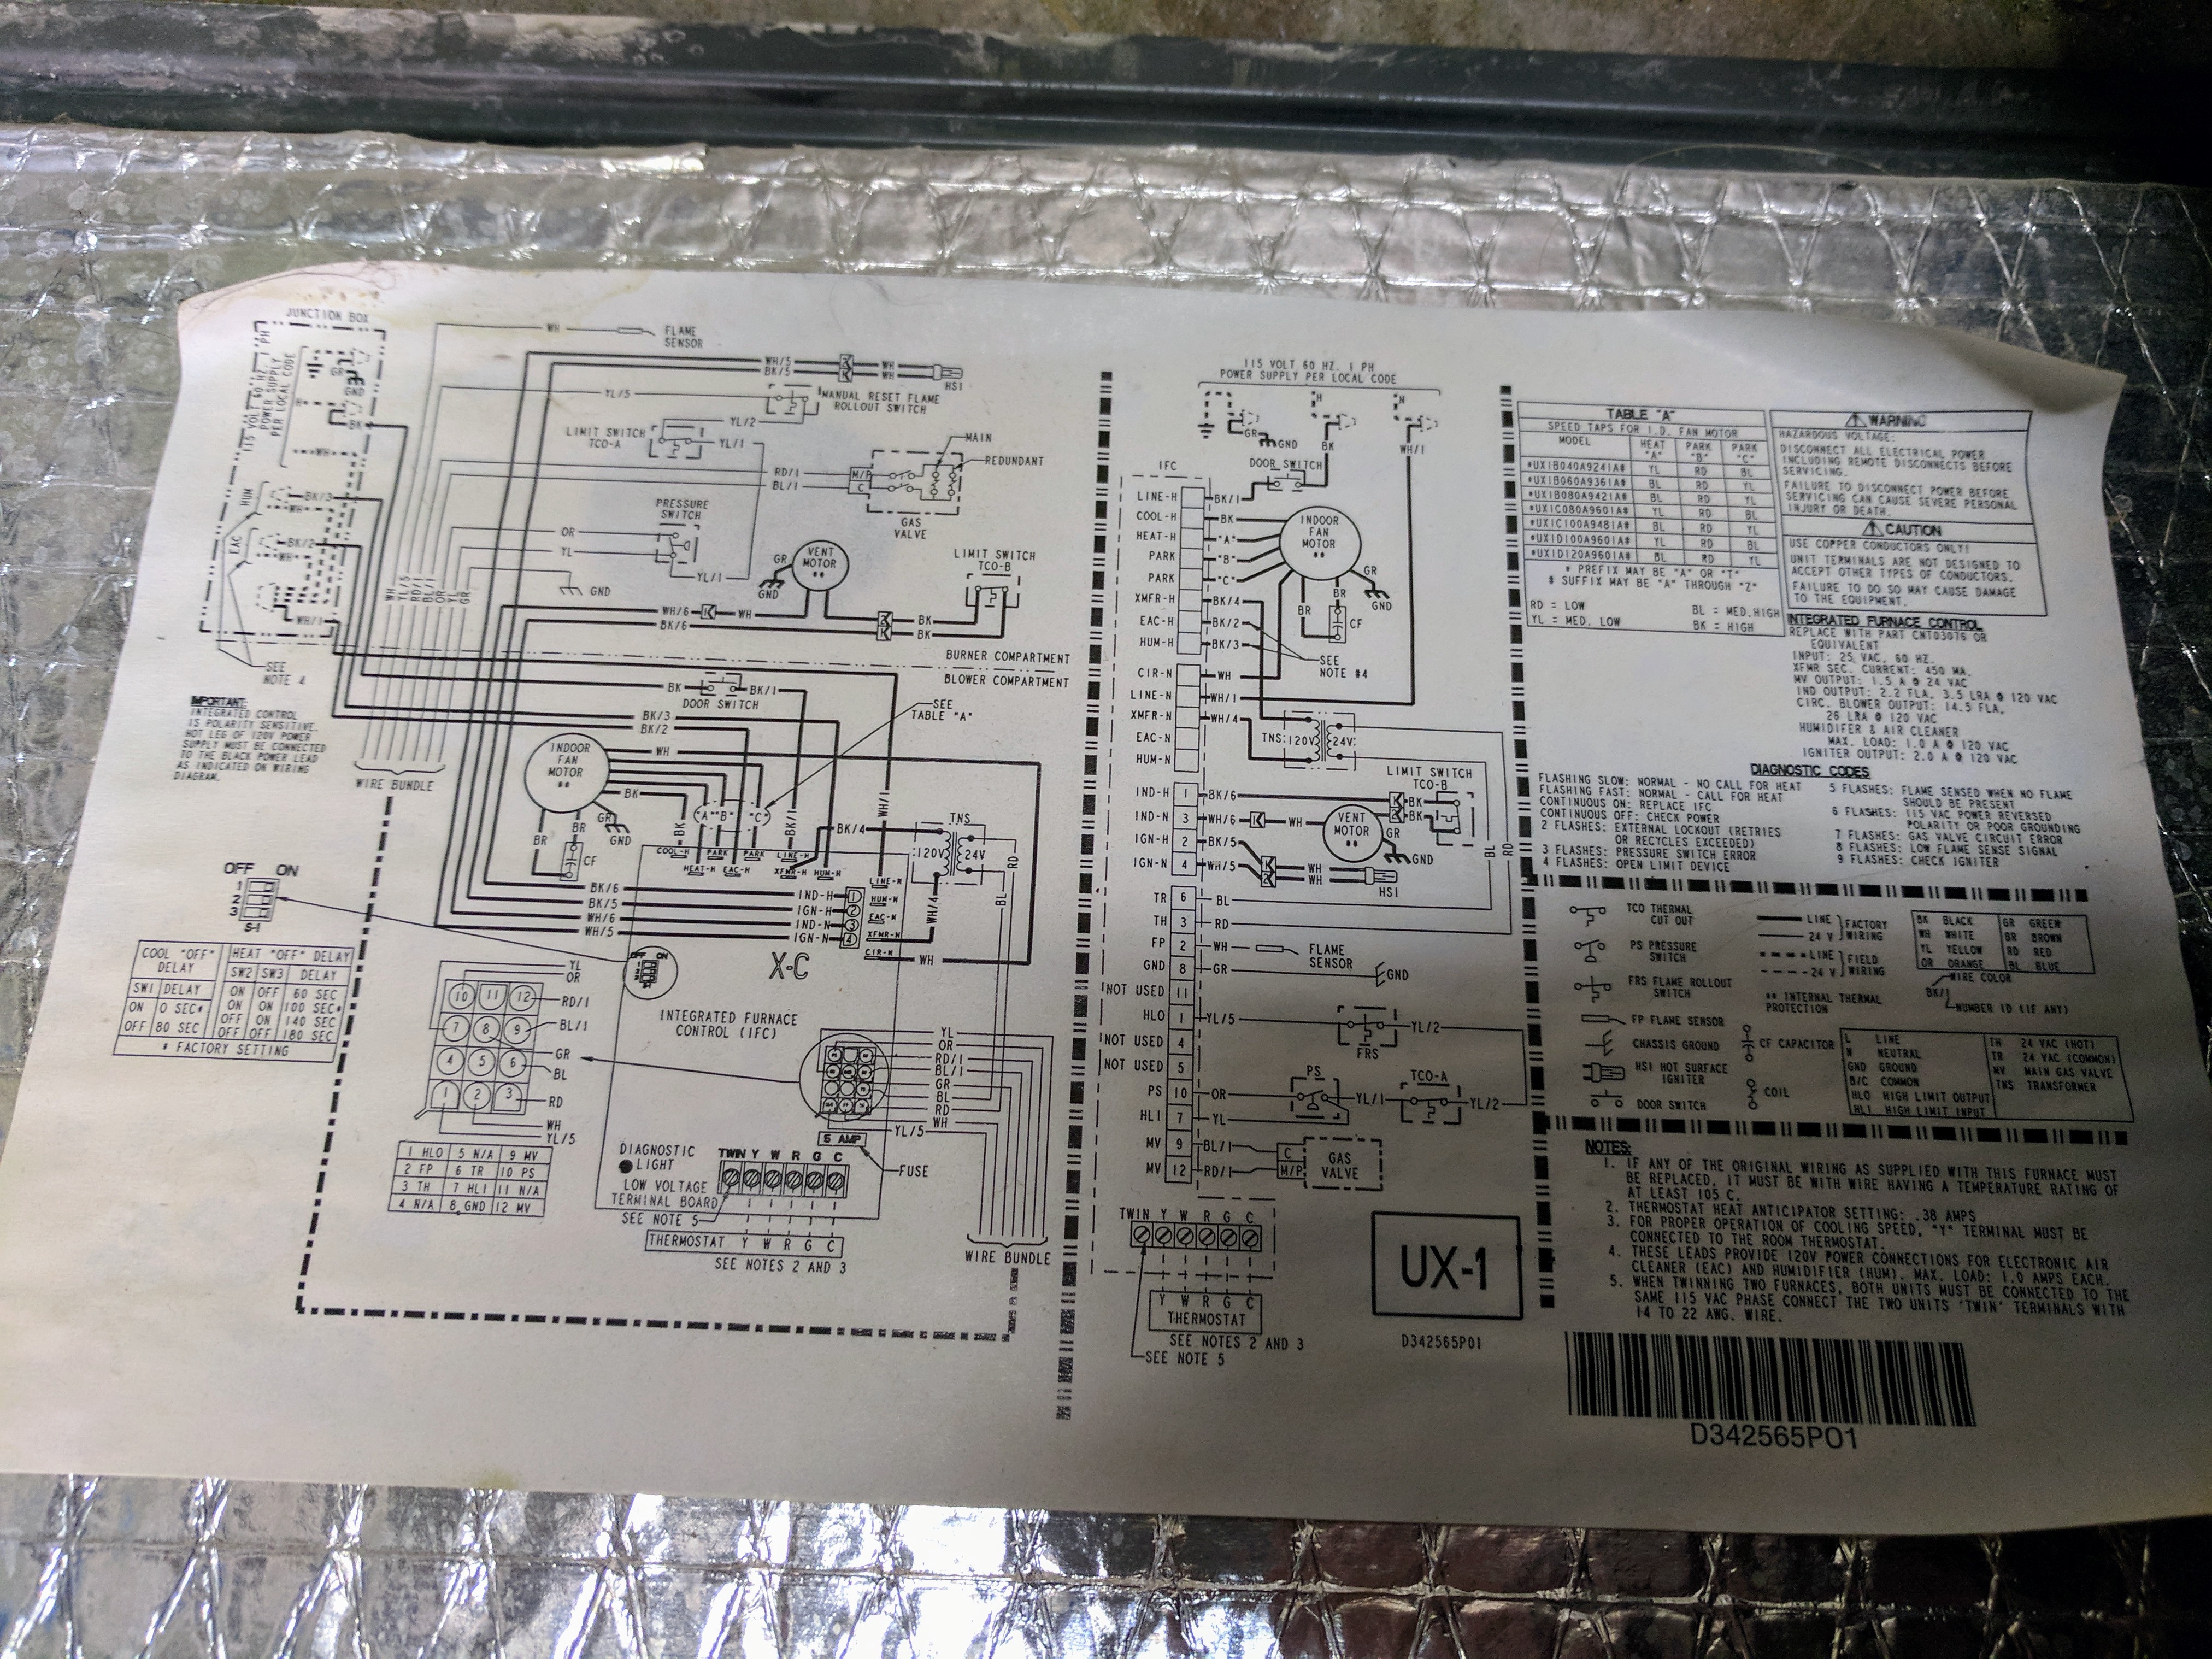
4) While this hasn’t happened (yet) to our XR90, a dirty flame sensor is a common furnace problem. Search Youtube for help cleaning the flame sensor. Such a condition might generate 4x or 8x flashes on the XR90, based on its schematic notes:
this blog post was very helpful. I was having similar symptoms. I had this same problem this week, and discovered that with the combustion cover on, the flame wasn’t propagating to the left-most (farthest from igniter) manifold. this was causing the flame sensor to trip as it wasn’t sensing flame. I found this odd that it would work just fine (startup normally) with the combustion cover off, but when I placed the cover back on, it would fail to start. I removed the 4 screws holding the gas manifold off, and adjusted each of the flame guides. Also, checked all the connections to each of the sensors, checked the air intake, cleaned the flame sensor with steel wool lightly, and re-assembled everything. now, it’s working perfectly. not sure which of my activities actually fixed it. I also just installed a condensate pump (what you are calling a water pump), so not sure if that has anything to do with it. Also, I fiddled with those two rubber grommets too, thinking they might be causing a pressure issue.
In your case, you might want to try removing the combustion shield (the metal cover with 6 screws, the one that says “WARNING” and has the looking glass). Start the unit and watch for the following sequence: combustion blower comes on for 30-60 seconds, call for heat, igniter starts to glow orange, gas valve opens, each manifold should show blue combustion, check to make sure the one furthest from the igniter is combusting. that is the one that should have the flame sensor in its path. if you aren’t getting combustion in that chamber, the flame sensor won’t sense flame and will shut the system down. That was the problem I was seeing.
Thank you for your help.
Thanks a lot for saving me in -38C Calgary sunday night ?
I appreciate your blog post! My Trane XR 90 was having the same symptoms: heat would stop, and the fan would run continuously. Your intake and exhaust location was interesting. Mine was installed a little differently from yours, fortunately; my air intake and exhaust both are on the roof and well out of sight of my dryer vent. The combustion intake has a protective cap to guard against things and water falling from the sky. The exhaust, strangely, is as open as a rain gauge. I learned that open tubes such as this are irresistible to crows, as they are fond of dropping twigs, bark, and leaves into vertical openings. I don’t know why. But since my HVAC is without AC, that pipe is fair game for crows all summer, and my fall maintenance includes removing the draft inducer to shake out the rattly bits and hope there’s not a lot of broken plastic fan parts in the mix.
Anyway, I had the 4 flashes error code. After several YouTube videos, I found the first accessible part that was a likely suspect. The high-temperature limit switch sits directly underneath the draft inducer, where an old stain of water leaked down from the improperly caulked junction and led straight down to the high-temp limit switch. There’s a fair amount of old rust on the screws and on the sheet metal of the combustion chamber. The evidence of leakage is old, so likely not a pro service emergency. The sensor itself had enough rust on it that I didn’t even check connectivity, I just ordered a new one. Nearly 2 weeks later, the new sensor arrived but was mounted inside a white plastic protective tray which made installation of the screws way harder than it should have been. Buttoned up, fired up, and the igniter was back in business. For about 4 days, and then the heat quit again. Fiddled with the switch, let the furnace rest, and eventually it came back on but quit again 2 days later. The fan blew constant unheated air as long as the thermostat was set to heat.
After a trip to purchase more sockets and short and long drivers to access the awkwardly placed fasteners, I removed the windowed faceplate of the combustion chamber. I found a straight-bladed flame sensor suspended over the leftmost jet, and removed it for inspection. It wasn’t the design I expected, but I polished it with emery cloth and reinstalled it. While I vacuumed out every nook and cranny of ash inside the chamber, I saw another flame sensor (L-shaped) mounted to the side of the right-most jet. It looked *green*. Like mossy green. That was the flame sensor I had expected to find. I polished it carefully but thoroughly with the emery cloth. For both flame sensors, I spritzed with isopropyl alcohol and wiped them dry before a final polish to remove any accidental skin oils from the metal. It is probably no coincidence that the the silvery (after polishing) L-shaped thermocouple with the green patina just happens to sit directly underneath the high-temp limit switch that had obviously been subjected to water in the past. Old dry rust stains below the sensor confirmed that water had sat for a time.
So, after a final button-up and a couple of attempts to reset the 4-flashing light error, this is the sequence that successfully reset the furnace: 1) Turn heat off from thermostat and wait for fan to stop. 2) Flip automatic reset toggle, near the gas inlet valve, from “ON” to “OFF” position. 3) Wait a few beats, then turn off electricity to the whole furnace circuit and let sit at least 30 minutes. 4) After 35-40 min, flip on electricity to furnace and thermostat. 5) Flip auto reset lever from “OFF” to “ON” position. 6) Turn on heat function at thermostat. Heat!! Just in the nick of time, too, as it’s now getting cold enough to freeze plumbing pipes and outdoor spigots.