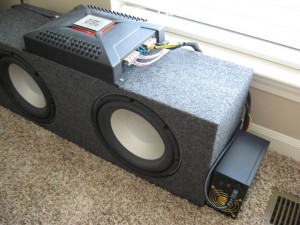
In an earlier decade, I accumulated an inane number of car audio subs and amplifiers. I’ve finally come to my senses (thank you, tinnitus :-/). But, I have yet to find a more pleasing sound than that which comes from an oldschool pair of Infinity Perfect 10.1‘s in a custom sealed box, powered by a JBL BP600.1. So, the pair now resides in my office, rather than my hatchback. This initially posed one problem:
How does one power a 12V amplifier indoors?
Obviously, we need a way to convert 120VAC mains to 12VDC at 600W+. High output DC power supplies are not cheap. It makes more sense to find a 4 ohm capable home audio subwoofer amp, but those are not cheap either.
There’s an easy solution, and that is to sacrifice an old ATX power supply (PSU). Audiophiles are now cringing; switching power supplies are a no-no in the audio realm. But so are Class D amplifiers, like the JBL BP600.1, which has an internally limited frequency response of just 10-320Hz. And again, it’s a car audio amplifier. This means its power supply stage was designed with excellent noise rejection, and thus, a switching power supply is a fine match.
Numerous tutorials explain How to Convert a Computer ATX Power Supply to a standalone DC supply, but most are targeted towards low power projects. In this instance, we need more than a few watts. We need every last electron the PSU can muster.
I pulled an old Thermaltake 430W PSU out of the closet. Before putting it to work, two modifications were needed:
- Combine all 12V wires and all ground wires to create two heavier-gauge wires, for adequate ampacity
- Force the power supply to turn on
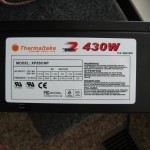
ATX PSU’s manufactured after ~2005 sometimes feature multiple +12V rails. While it should be safe to merge multiple 12V rails, doing so could be a bad idea for this project (possibly more noise from multiple switching supplies). Multiple rails are usually labeled on the side of the supply as “+12V1” and “+12V2”, or similar. Luckily, the supply I butchered has only a single +12V rail rated for 18A, meaning 216W of 12V goodness. This isn’t enough power to push the 600W RMS amp to its limits, but that’s okay. I don’t need 600W of bass in my office.
Safety
Note that this project involves potentially lethal mains voltages (120VAC). A PSU should never be opened or modified by an unqualified individual. Perform these modifications at your own risk! I am not responsible for any damages that may occur as a result of this article.
Capacitors in a PSU store a large amount of energy. With the PSU running, turn its switch off (or pull the power cord) and wait for the connected device(s) to shut off. Only open the PSU after you are sure it is drained of energy.
Wire Pruning
A modern ATX 2.x PSU contains a 24 pin motherboard header, at least one 4- or 6-pin +12V connector, and a multitude of +5/+12V molex, floppy, SATA, and GPU connectors. We only need the black wires (ground) and +12V wires (yellow). Ignoring the safety warning stickers, I removed the cover and proceeded to extract all extra wires. All useless wires from the ATX motherboard header and various connectors landed straight on the circuit board. These were easily removed with wire cutters.
A few inches of the green “power on” wire (ATX pin 20/24 as explained here) was preserved and soldered to a ground wire. I temporarily used hot glue, but this isn’t safe or recommended. Use twist wire caps or heat shrink wrap for a permanent installation.
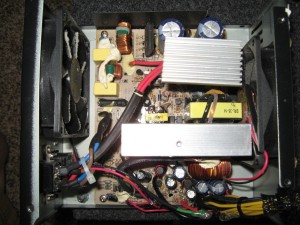
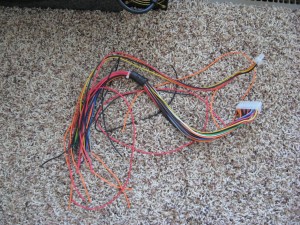
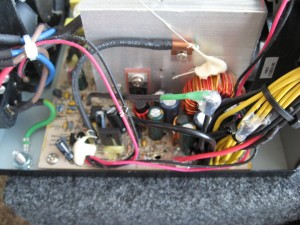
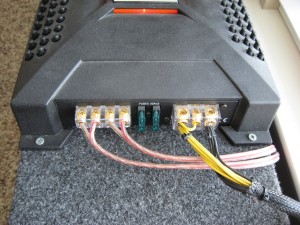
With the PSU cover back on, I untangled the remaining yellow & black wires, trimmed them to equal lengths, and wired the modified PSU to the amplifier. The final product, with tidy wire-ties in place:
Results
The BP600.1 and ATX PSU deliver deep, clean, ridiculous house-shaking bass. The setup absolutely blows away my Boston Acoustics CSSUB10B (and especially the lowly Logitech Z-2300’s). I’ve only cranked the volume too high a few times in the past year. When the amp draws too much current, the PSU struggles to keeps up and the amp’s LEDs dim during bass hits. It’s rare that I need/want ~135dB bass in my office, though.
There’s one downside: Activating the subwoofer is slightly inconvenient since the PSU must be manually switched on. I’ve tried going back to my home audio subs, but they don’t stack up to the quality of the Infinity Perfects.
is it dual supply output ?and how many watts really it give….
You do realise your only getting 18amps on the 12volt rail = 216 watts
Yep, this is addressed in the post–don’t need that much power in my house! Neighbors already glare at my office as they walk by. Any more power and I’d have the police at my doorstep.
Awesome stuff. Awesome explanation. Thank you.
I am attempting this tomorrow 🙂
@%)W PSU, 200W RMS DHD Amp + 350W RMS Infinity Reference Sub.
Its only for my home theatre and do not require much power. I did not want to spend extra $$$ as i have these things at my disposal already
Sorry. 250W PSU
felicidades excelente explicación!
Hey guys iv had this setup for awhile but its been put on the metaphorical shelf. I have a shitty levono PSU thats 18A on the +12V lane. Anywho It works. Problem is I get a crazy hum. Im plugging an Xbox into as the source. Not sure if the source is the issue or the shitty PSU. Input would be very appreciated.
That’s ground loop. Try different AC outputs, or resort to a ground loop isolator:
http://www.radioshack.com/product/index.jsp?productId=2062214
Forget all those PC PS, try this, cheap and powerfull
http://www.rcgroups.com/forums/showthread.php?t=1965624
Similar setup here… however! I use one of the 5 volt (red) psu outputs on thee remote terminal of the amp. Solves another issue as well. With some PSUs there has to be “load” for it to power up… and some recommend a 10 ohm resistor soldered to a red and black wire. Me using the red wire to turn on amplifier… well no resistor needed, the amp is the load
Hi thanks for the info! I tried wiring it up like you have it, a jump from the 12+ to the remote block, but my 650W psu stays on for like 2 seconds with the amp powered up, then shuts off and won’t turn back on for a couple of minutes. Any idea why? I tried Charles’ suggestion by using the 5V to the remote block, but the app never turned on.
I have a system that i was going to install oh about 4 yrs ago till a car stuck me & now i can’t drive so I hooked it up in my room anyway I have it connected to a battery the system consists a jvc double din receiver, a small skar audio evl 4 channel amp & soundqubed 800w powering 3 10″ jl audio10wo how many power supplies do i need?
If you connect all the 12V wires on the PSU output, you will want to make sure the PSU has a single 12V rail….