Today I needed to deploy a Unifi Security Gateway (USG) into my existing network, which runs on several Unifi switches and APs. We use a router IP of 10.0.1.1 and require several DHCP Reservations. I’d put off upgrading to a USG due to limited configuration options for the DHCP server, but it turns out that reservations are totally possible.
Swapping Old Router for a USG
A UBNT employee recently posted this guide, so I thought I’d only need 5 minutes to deploy the USG. It ended up taking 3 hours due to some minor, but critical omissions in the guide which resulted in Adoption Failed. Those omissions are highlighted in red in the steps below.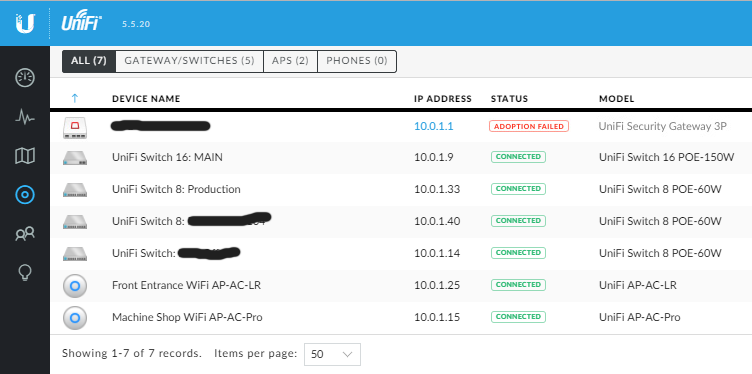
As the UBNT article provides no way to leave a public comment, here’s the process I followed that led to success. Please keep in mind this post is written from memory, so please comment if I’ve goofed up. I suspect the UBNT article was written in the same manner.
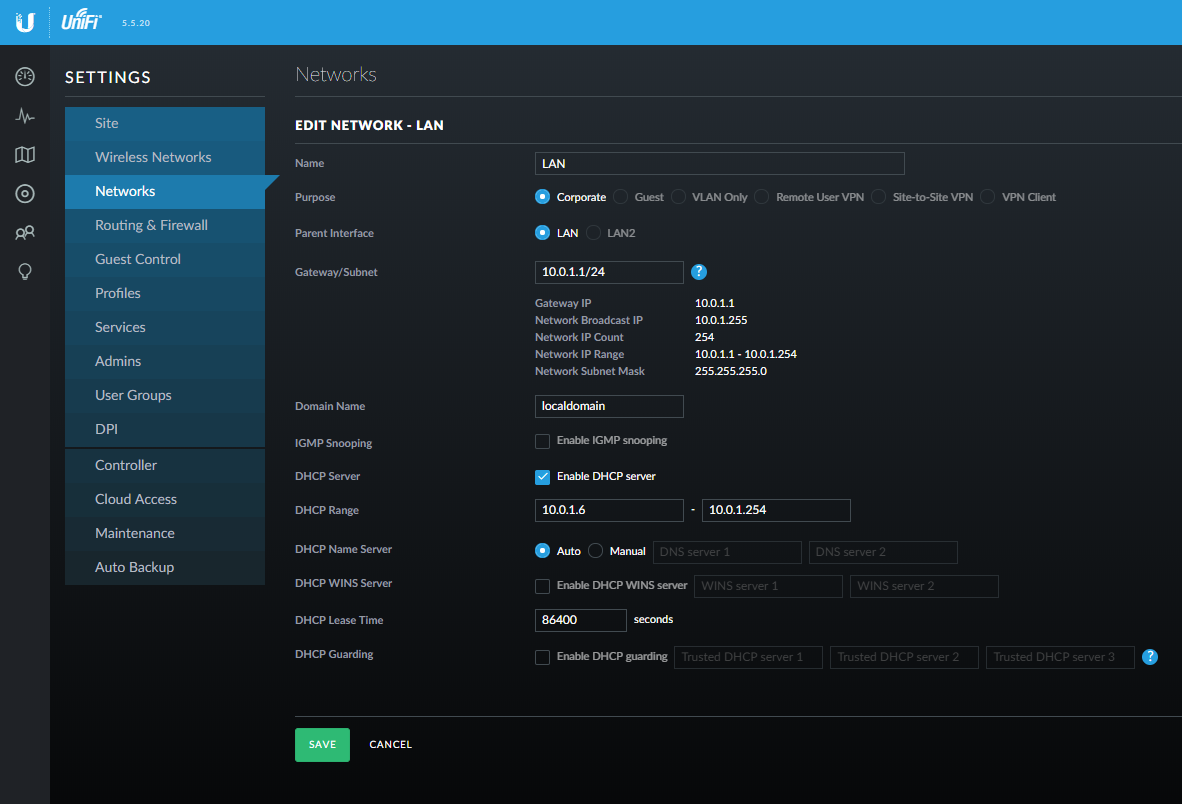
1) Configure the LAN Network in UniFi Controller
The UBNT Guide is correct. Begin by setting Gateway/Submnet to 10.0.1.1/24 (or desired IP) in the UniFi Controller, then click Save.
2) Change the USG’s LAN IP
- Connect a PC’s Ethernet port directly to the USG’s LAN1 port and power up the USG.
- After the USG boots, indicated by a solid white light, SSH into 192.168.1.1 with username and password ubnt/ubnt.
- Execute the commands below, replacing 10.0.1.1 with the desired router IP you assigned in the UniFi Controller:
configure

set interfaces ethernet eth1 address 10.0.1.1/24

delete interfaces ethernet eth1 address 192.168.1.1/24

commit
The SSH session will lose connectivity at this point, but do not power off the USG! I’d incorrectly assumed that committing would save changes in non-volatile memory. This blog post was a great help. As soon as I unplugged the USG and walked into the patch closet to plug into our main switch, the LAN IP change was lost. - Unplug the old router from the network and connect the USG’s LAN1 port to your main switch. The USG will fail to adopt if the old router is still connected.
- If you do not need to make DHCP Reservations, move along to the next step.
DHCP Reservations: As of December 2017, DHCP Reservations in the UniFi Controller are still an active feature request. Controller v5.5.x supports “fixed IP”, but a USG is a prerequisite, and a fixed IP can only be assigned to a client who has already connected to the network.My UniFi Controller recognized the USG and enabled “fixed IP” selection before the USG had been adopted (perhaps due to theAdoption Failedstatus?). Before I adopted the USG, and with my old router disconnected, I manually selectedUse a fixed IP addressand clicked Save for all clients with existing DHCP reservations on the old router:

- Adopt the USG in the controller.
- Configure
Connection Typeunder the USG’s WAN settings in the Controller, then connect your modem to the USG’s WAN1 port and click Queue Changes.
The USG finally adopted and provisioned with all DHCP Reservations intact.

Summary
- Do not unplug USG after making command line changes via SSH.
- Do unplug old router before connecting USG LAN1 to network.
- Defining DCHP Reservations is possible when migrating from an old router to a USG. Simply click
Use Fixed IPon each client immediately before adoption.
I was so confused before to see this article when I went to migrate from an Existing Router to Ubiquiti USG with DHCP Reservations but I was unable to migrate. When in minute i saw this article then i clearly understood about to migrate.
Thanks
Ashifa Khan
CMS Development
Holy crap, thank you for this blog post. Got my USG all set up after banging my head about the adoption failure and it’s web interface not looking like what Ubiquiti said it should.
Thank you, I spent few hours trying lot of think with the cloud key but nothing was working.
On my side, I first add the new ip address and did the adoption before removing the old one, through the ssh console.
I work seamless after that.
After issuing the “commit” command to save the changes to the running configuration, issue the “save” command to save changes to the boot configuration. Then issue the “shutdown” command to safely shutdown the device. It can then be unplugged and moved, and the changes will be remembered.
Thanks for the article. It was helpful.
Actually, you have to do a save first and then a commit (which changes the LAN IP in the running config) or you can save and shutdown so you get the new LAN IP on the next boot. A third option is to commit and the re-ssh into the USG using the new LAN IP, then issue a save and shutdown.
I was getting adoption failed also, turns out my problem was that i was using “root” as the ssh user in the unifi controller. I had to change that to something else for it to work.
Also, as of today, you should not need to use the ssh step to change the IP if you update/upgrade the USG software prior to making IP changes. If you update first, the USG has a web interface where you can make those changes. I’m on USG 4.4.34+.
Thank you for your write-up, but BE CAREFUL people! This completely bricked my brand new USG … but I’m not even that mad because this told me exactly what I needed to know: having to go through all this trouble, to find these complex steps that involves sshing into a device and typing terminal commands, all written by the someone else, not even the company who built and is supposed to support this device, all just to change the default subnet … only to get irrevocably BRICKED (unless you have some weird console cable maybe) … is telling me that Ubiquiti equipment was probably not the right choice for me to replace my Airport Extreme, which the only problem I ever had with it in almost a decade is that Apple decided to discontinue it.