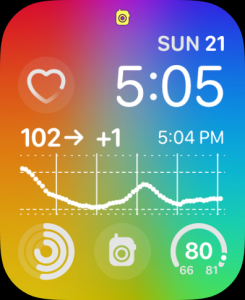
Building a RepRap Prusa Mendel

My RepRap Prusa: Three months' progress

Earlier this summer my company spent a fair chunk of change on rapid prototypes printed by professional fused deposition modelling (FDM) printers. Thinking this was a huge waste of cash, Google led me to the RepRap project: Personal 3D printing for as little as $350. Of course, I had to build one.

The RepRap Wiki suggested a Prusa Mendel. Its bill of materials and instructions seemed well prepared, and the list of suppliers even seemed strong (note the keyword here–”seemed”). As an open source project, I should’ve known what I was getting into!

RepRap is a vibrant, rapidly growing opensource community for two reasons. First, people are inherently fascinated by a machine that makes real, physical objects. Second, home 3D printing is still in its infancy. Assembly of a 3D printer demands enormous exchange of ideas. One must gather a basic knowledge of electronics, programming, and machining. You’ll inevitably have questions, and once you step into the forums or IRC, it’s unlikely to be your last visit.

Consequently, RepRap is the child of thousands of ‘makers’, engineers, and programmers around the world. PhD’s and kids alike contribute to its development. The movement has resulted in a number of start-ups, including the recent $10MM VC-funded Makerbot in New York, which has subsequently brought significant media coverage to opensource 3D printing (CNN, Colbert Report, NPR, the New York Times, just to name a few). I’m impressed with the brand name they’ve established, but ultimately they’re selling an expensive kit. At 1/3 the price, and with potentially better performance, a Prusa is the way to go.

Gathering Parts

Motors and filament from Ultimachine

I thought I’d take the easy route and grab a Prusa kit off eBay. elderfarrer2hy7 had the best price at the time ($160) on a kit which included all printed parts, nuts, bolts, bearings, belts, and a laser cut acrylic bed. All I needed was a set of rods, electronics, motors and a weakly documented, but crucial piece referred to as a “hotend”. And of course some plastic filament. Or so I thought.

elderfarrer2hy7′s kit showed up within days. I then ordered:

Hot-End Selection

For those new to RepRap, the hot-end essentially acts like a hot-glue gun. The extruder feeds ABS or PLA filament into the hot-end, which is held at 180-240C depending on your chosen filament. At the further end is a nozzle with a standard diameter of 0.35mm (more or less depending on what’s available). Note that 1.75mm filament does not yield improved resolution over 3mm filament. Layer thickness and precision is dictated by nozzle diameter. A good hot-end with a 3mm extruder will print as quickly and accurately as a 1.75mm extruder. Anyway, three types of hot-ends are currently in use: ceramic core, power resistor, and cartridge heaters.

    • Ceramic cores use a piece of thin nichrome wire, wrapped tightly around the hot-end and covered in a layer of hardened ceramic paste. The nichrome wire heats up like coils in a toaster. Assembly is time consuming and messy, but it’s reliable.
    • Power resistor hot-ends are simpler. Stick a 5 to 6 ohm power resistor into the hot-end and you’re done. However, operating a resistor at 240C longterm means it’s operating way out of spec. As long as the resistor isn’t physically disturbed, it should hold up for months or maybe years. But if disturbed, the abused resistor will shatter. In my opinion, a mostly reliable $1 power resistors far outweighs the messy assembly of a nichrome wire kit.
    • Cartridge heaters are used by Makerbot. This is the same type of heating element found in soldering irons and similar devices. Cartridges are more robust than power resistors, but still not bulletproof. Makergear and a few others in the DIY community have experimented with cartridges. Supposedly they haven’t been widely adopted due to poor availability for our 12V application. It’s easier to use a cheap power resistor.
I wanted to buy a power resistor type hot-end from Mendel-parts.com, but every model was sold out. In fact, every power resistor hotend I could find anywhere was out of stock.

Disappointed, I bought a Makergear 0.35mm Hot-End Pack (a nichrome wire kit). Rick at Makergear is a great guy. Very helpful, friendly service, and his hot-end kits are enormously popular in the community. Unfortunately, Rick’s site is a disaster! Get it together, man!

J-Head MKIII-B Hot-End. Power resistor pictured in fuzzy right corner.

Alas, I cannot recommend the Makergear hot-end pack. First of all, it’s $75. Second, it took hours to assemble and harden. Third, it flat out failed, as I’ll explain below. Get a J-Head MKIII from “Reifsnyderb”. It’s under $65, arrives 95% assembled, and just works.

Also worth consideration is the Budaschnozzle from LulzBots for $75. I haven’t personally tried one, but it looks awesome and supposedly works equally well. Arcol.hu has a similar hotend for $134–ouch.

Electronics Selection

I narrowed down the choice of electronics to RAMPS or Gen6. RAMPS supports heatbed control and 1/16 microstepping, but the board looks like a disaster in terms of layout and motor/sensor wiring, and further requires the purchase of separate Pololu stepper drivers and an Arduino Mega. RAMPS is a favorite in the community, but I design PCBs for a living and looking at it made my stomach turn.

Gen6 is well designed, but was sold out. Heatbeds don’t necessarily need software control, and I didn’t think I needed one at the time (newbie mistake). I also convinced myself that since the stepper motors only had 200 steps per rotation, subdividing those steps with 1/8 microstepping couldn’t possibly be much worse than 1/16. [Verdict: True. 0.9° motors with 1/8 microstepping are more accurate than 1.8° motors with 1/16 microstepping.]

One of the freshly assembled Gen6 boards

So what’d I do? Like any self respecting EE, I ran the numbers and ordered 250 Gen6 PCBs. My company sent a batch to our favorite assembly shop, and I had electronics in hand within three weeks. Super easy, and cheap (well, per board…). PCBs and assembled Gen6′s are still available.

For power, I went with a 12V, 15A power supply from “jingsam-online” on eBay. This is barely adequate with a heatbed connected–the supply runs at almost 70C. In retrospect, $10 more for the 30A version would have been a better investment.

Assembly – Weekend #1

6ft shipping tube of rods, and parts kit at arrival

Smooth and threaded rods arrived from McMaster in a 6ft tube. The Prusa assembly guide stated required rod lengths, but did not suggest tools for cutting the 2 meter steel rods. I’m still not sure of a preferred cutting method, but my brother-in-law brought over a dremel and we picked up some fresh rotary discs from Lowes. We spent two long evenings cutting rods. Unless you have a better idea, buy pre-cut rods.

Assembly – Weekend #2

Prusa frame assembled on kitchen table.

The majority of the frame went together the next weekend. However, we quickly hit another hurdle: PLA bushings! All of our parts were printed in ABS, including the “PLA bushings”. These pieces are supposed to enable the X, Y, and Z axis to glide freely along the smooth rods. We weren’t so lucky. Our PLA (ABS?) bushings snapped onto the smooth rods but would not budge. We filed them down and tried other suggestions from the RepRap forums to no avail.

I remembered a line from the Prusa Wiki which mentioned linear bearings. Aha. That’s what they were talking about. PLA bushings work for some people, and have the clear advantage of cheapness. But reliability is spotty. Serious CNC machines use linear bearings for axis movement. So, I ordered a set of LM8UU bearings from a Chinese eBay seller. [VXB sells LME8UU bearings in the USA at twice the price.]

The LM8UU mod also meant I needed a new X-carriage, Y-bed LM8UU mounts, and X-ends. These were easily found on Thingiverse.com:

I e-mailed elderfarrer2hy7 and he quickly hooked me up. Edit: Looks like he now sells kits made for linear bearings!

After I built my printer, Prusa himself released an official LM8UU X-end set. I’ve printed them but still prefer the design by ahmetcemturan.

Assembly – Weekends #3 and #4

While waiting for the Chinese LM8UU’s, we assembled the Makergear Hotend pack and Wade’s extruder. After much head scratching at Rick’s documentation, we had an assembled heatcore and Groovemount.

Cutting the hobbed bolt was a disaster. Again, we resorted to the dremel:

The best of our three hobbing attempts. Not so good.

We ended up with two failed attempts and one marginally successful “hobbed” bolt from this adventure.

For about an hour, we had no faith in the Wade’s Extruder because the filament passed through only against the hobbed bolt (no opposing force, so it kept slipping). I finally realized that we hadn’t attached the Idler block and 608 bearing…right…

I ended up ordering a hobbed bolt from Eckertech. Much, much better:

Eckertech hobbed bolt (photo taken weeks after initial hobbing attempts)

Assembly – Weekends #5 and #6

The LM8UU’s showed up after two weeks, followed closely by the finished Gen6 boards. Final assembly only took a couple days, but it was quickly apparent we were nowhere near finished.

Assembled Prusa, prior to troubleshooting

We started with the simplest problems:

  • X axis, Z axis, and the extruder ran backwards. Solution: Edited FiveD firmware and calibrated X, Y, and Z steps_per_mm.
  • Y axis would only travel forward. Solution: My soldering had killed the Y mechanical endstop. Replaced with a microswitch from RadioShack.

Pile of junk ABS extrusion after hours of jams

MakerGear Trouble – After knocking out the simple stuff, we tried to extrude plastic. And that’s when the real problems began. We spent about six hours with the Makergear hotend, yet only managed to produce a small pile of extruded ABS. This took days to troubleshoot. Here’s what I learned:

  1. We first tried to extrude ABS at 245C. When this failed (actually due to bad hobbing), we switched to PLA at 240C. Dumb move. The PLA expanded, jammed, and slowly burned up in the Makergear hotend. We had to drill it out. So, never set temps too high. PLA should be used at 180-220C. ABS: 220-250C.
  2. We had enormous difficulty with the springs elderfarrer2hy7 provided. They lacked sufficient force, so the hobbed bolt would spin without pushing plastic and thus slowly strip the filament. The filament could be manually extruded by hand, if not already jammed. In short, Wade’s Extruder needs springs with a strong load force (25-35N). Problem was solved by switching to McMaster 9434K164 springs.

    About to disassemble the Makergear hotend after another jam (weak springs pictured)...

Even after solving each of these problems, the Makergear hotend continued to jam with ABS at 225-230C. Upon closer inspection, I found that the PTFE lining inside the Groovemount was off-center. This, along with the previously burnt PLA were likely causes of continued trouble. Many people have great success with the Makergear hotend kit, so I can’t fault it. These were user errors.

A Working Hotend – Weekend #7

J Head MKII Hotend for Wade's Extruder

Ultimately, I wasn’t happy with the Makergear hotend, and definitely didn’t want to blow more cash on a replacement. I found a guy in the RepRap forums named reifsnyderb, who’d previously sold a nice looking J Head Nozzle (a power resistor hotend). We exchanged a few e-mails and he agreed to machine a custom J Head MKII for my Wade’s Extruder.

The J Head MKII arrived in just two days! I wired up the resistor and thermistor, wrapped it all in Kapton tape, and fired up Repsnapper. Even without calibrating the extruder, it managed a test print.

Success! But still a long way from reliable printing…

J Head MKII after a few successful prints

Filament and Software Troubles – Weekends #8 and #9

Although the printer was technically working, there were still a few issues to work out.

ABS shavings on hobbed bolt. Tighten springs to resolve.

First, filament would randomly strip after anywhere from five minutes to three hours of printing. I’d have to pull the hobbed bolt out, clear the plastic shavings, and re-assemble. This issue took days to troubleshoot, but the solution was easy–tighten the extruder springs. Since then, no more stripped filament.

Next, ABS would barely stick to the acrylic bed. About halfway through the test cube print in the above video, the print ripped off the platform. Less than 1 in 5 print attempts would stick at all.

Verifying heatbed temp

In other words, a heatbed is an absolute must. Once more, Prusa’s MK1 PCB heatbed was sold out in North America; I resorted to ordering 25 from my PCB house.

Heatbed PCBs arrived in a week. I temporarily mounted one atop the acrylic bed using 1/4″ Nylon standoffs, following Prusa’s “final” mounting solution–glass covered with Kapton tape and attached with bulldog clips.

For wire, I used 14AWG THHN, rated for 105C. The outer PCB traces connecting to the power supply leads are thicker, so this region of the board is cooler and it’s safe to use 105C wire here. Glass came from Lowes for about $2. I had to trim the corners (tip: use scissors underwater).

Because Gen6 has no heated bed support, the heatbed is wired directly to my 12V, 15A power supply. The glass surface reaches 100C in about five minutes, and 110C after 15-30 minutes, as measured by thermal probe.

First print with Prusa MK1 heatbed + SFACT!

Up to this point, I’d used Repsnapper as a host, as per severely out of date documentation from Mendel-Parts.com. It was time to move to SFACT and Printrun/Pronterface. Printrun is a solid graphical interface, which relies upon SFACT/Skeinforge for gcode generation. It’s daunting at first, but prints beautifully. Just one downside: Skeinforge is CPU hungry. Kliment (author) says he’s working on optimization.

I was also using FiveD firmware downloaded from Mendel-Parts.com. FiveD lacks acceleration and I was seeing occasional pauses during Z-axis movement. I flashed to Kliment’s latest Sprinter firmware and increased the baud rate to 38400. No more hiccups. Also, acceleration is a glorious thing.

While editing Sprinter’s configuration.h file, I took the time to document proper equations for the Prusa:

  • Formula for X steps per mm = Y steps per mm = (Steps)/(Microstepping *BeltPitch*PulleyTeeth)
  • Formula for Z steps per mm = (Steps)/(Microstepping*Zd)
  • Formula for E steps per mm = (Steps*ERatio)/(pi*Microstepping*BoltDiamter)
  • Steps = Number of motor steps per one revolution (200 for 1.8 degree, 400 for 0.9 degree motor, etc.)
  • Microstepping = Microstepping ratio of controller (1/8 for Gen6, 1/16 for Pololu, etc.)
  • BeltPitch = Distance in millimeters between teeth of belt (5.00mm for T5, 5.08mm for XL, etc.)
  • PulleyTeeth = Number of teeth on the motor pulley gear (default is 8 teeth for T5 gears; XL gears may use 10)
  • Zd = Distance in millimeters between threads of Z rods (1.25mm for M8)
  • ERatio = Gear ratio for extruder gears (Wade’s Extruder: 39/11, Accessible Wade’s by Greg Frost: 43/10, Adrian’s Extruder: 59/11, etc.)
  • BoltDiameter = Diameter of hobbed bolt in millimeters, measured at hobbed section

These formulas have since been added to the Prusa Wiki.

Minor Tweaks – Weekend #10

Replaced acrylic bed with MDF, added Z constraints, and installed helical Z couplings

Heat warps acrylic, so within days of installing the heatbed, I had to replace the acrylic printbed with 1/4″ MDF bed ($6 from Lowes and half an hour with a jigsaw). Acrylic was junk to begin with. It flexes too much, even without heat, which added great difficulty to bed alignment. Use MDF.

I also replaced the plastic Z-couplers with aluminum helical couplings and added ScribbleJ’s Prusa Z Rod Constraints.

My Prusa has been exiled from the kitchen. It now resides in the basement, where it’s printed for 90+ hours in the past two weeks, including two full sets of Prusa parts.

What comes next?

FINAL THOUGHTS

  1. I should’ve started blogging 10 weeks ago.
  2. If you build a Prusa, use LM8UU linear bearings, a heatbed, a good hotend (J Head MKIII-B!), and strong bed and extruder springs. Also grab the latest popular firmware and software. And buy a digital caliper.
  3. RepRap is not cheap. If you build one, you will find the need to build more. That said, it would’ve been cheaper if I’d built a hybrid SAE + metric Prusa. See also this Wade’s Extruder BOM.
  4. Don’t build a RepRap on the kitchen table. Does not please the wife.

Special thanks go to: Nick, Reifsnyderb, and everyone on Freenode #reprap!

USPS Quietly Improves Tracking

Live USPS Tracking?

E-tailers and consumers know that USPS tracking is a joke. For several years, Delivery Confirmation (DC) was just what its name implies—a method of checking that a package had been delivered. Although USPS.com displays a “Track and Confirm” search field on their website, DC numbers have historically returned two points of information (acceptance and delivery), coupled with one very misleading statement:

Information, if available, is updated every evening. Please check again later.

  • Your item was accepted at 1:06 PM on May 23, 2008 in St. Louis, MO 63103.

Information was generally not updated until the package had been delivered. More tracking points have begun to show up in the past 5 years, but we were still told to maybe expect more information each evening. Lies.

I happened to check on an incoming Priority shipment last week and noticed a new statement: Continue reading

Illinois Unemployment Insurance Rates Rise

One of the first topics our tax agent covered a few years back was unemployment tax. Larry said, “Single-employee S-corporations must pay unemployment insurance, but you can never claim unemployment from your own dissolved company. I don’t believe this is fair, but there’s nothing we can do about it.” So we pay unemployment taxes.

As usual, NPR delivered several gloomy economic reports this week as the U.S. Unemployment Rate rose again to 9.8%. I listened to interviewees on both sides of the fence share their stories. Some Americans are earnestly seeking employment, yet remain unemployed. Others admit that 6+ months of unemployment checks are simply an incentive for them to sit at home until the free money stops coming.

Today my company received a letter from the State of Illinois’ Department of Employment Security. Inside was our Annual Contribution Rate Determination, aka, a declaration of how much Unemployment Tax/Insurance we must pay:

2011 Illinois Contribution Rate Determination: 3.8%!

This year’s rate has increased about 0.5% Continue reading

Non-mobile Websites on the iPhone

If you’re reading this, you probably already understand why one might wish to view a regular, non-mobile website on the iPhone. For example, eBay now forcefully redirects iPhone traffic to a limited functionality mobile site (http://mobileweb.ebay.com). Among other things, relisting auctions from the mobileweb.ebay site is impossible. Blasphemy!

The Workaround

Servers perform these frustrating redirects by reading the browser’s “user-agent” ID. So, if we spoof the iPhone browser’s user-agent ID, web servers will believe the iPhone is a regular desktop browser. But, the iPhone’s Safari browser doesn’t support user-agent spoofing. This leaves us with two choices:

1) Jailbreak the iPhone

or

2) Install a browser app that supports user-agent spoofing

I went with option (2) and downloaded a browser called JourneyLite.

1) Download the free JourneyLite app:

Success: www.ebay.com (Non-mobile!)


Continue reading

How to Power 12V Amplifiers from an ATX Power Supply

Car Audio: Without a Car

In an earlier decade, I accumulated an inane number of car audio subs and amplifiers. I’ve finally come to my senses (thank you, tinnitus :-/). But, I have yet to find a more pleasing sound than that which comes from an oldschool pair of Infinity Perfect 10.1‘s in a custom sealed box, powered by a JBL BP600.1. So, the pair now resides in my office, rather than my hatchback. This initially posed one problem:

How does one power a 12V amplifier indoors?

Continue reading

Wireless Router Setup with Verizon DSL

Despite over a decade of networking experience, I spent two hours on the phone this past weekend with my sister as she attempted to setup a wireless router with her Verizon DSL. Needless to say, it didn’t go as expected. Here’s what we learned…

First, a bit of background info. There are three types of authentication that Verizon can use:

A) DHCP only — Verizon reads your current MAC address and assigns an IP address
B) PPPoE only — A username/password is required, but MAC address is ignored
C) Both PPPoe and DHCP

Like many other Verizon users, I initially setup MAC address cloning on our router, expecting to trick Verizon’s servers. I then setup PPPoE and thought we would be done. No go! Continue reading

Charter and DOCSIS 3.0 (Motorola SB6120 Review)

I subscribe to one of the cheapest broadband options in the area,  Charter’s “Express” cable service, which is advertised as an 8Mb downstream / 1Mb upstream service on a DOCSIS 2.0 cable network. Believing Charter’s DOCSIS 2.0 claim, I plugged in a cheap Linksys CM100 cable modem when we first signed up. After observing nearly double the advertised download speeds, I started to wonder if Charter’s sales representatives were mistaken. We’re in a brand new neighborhood just 20 miles east of St. Louis. Why wouldn’t they have hooked up fancy new DOCSIS 3.0 lines?

Google searches revealed nothing definite. Some folks claimed that upgrading to a DOCSIS 3.0 modem brought much greater performance, even on DOCSIS 2.0 lines. Some claimed no changes at all. I still wasn’t sure whether my area supported DOCSIS 3.0 or not, and further, I assumed that those who saw major benefits were subscribers of top-tier, 25Mb+ services. Then I read about Powerboost®, which is apparently the reason I see download speeds above 8Mb/sec. So, if I was right about my cable line, channel bonding might further improve performance.

Motorola’s SB6120, a DOCSIS 3.0 modem, was on sale at Best Buy last week. I had to pick one up to satisfy my nerdy curiosity.

The SB6120 makes things simple: Blue status LEDs = channel bonding (DOCSIS 3.0); Green LEDs = no channel bonding (not DOCSIS 3.0). Sure enough, the SB6120 booted up with a blue “Receive” LED. Logging into the status page (http://192.168.100.1) confirmed 4 bonded channels.

LEDs top to bottom: Link, Online, Send, Receive, Power

Continue reading

Song Playcount: 592… (Katy B – On A Mission)

I was listening to BBC Radio 1 over the weekend and heard Katy B’s On a Mission for the first time. Normally when a song gets stuck in my head, I get distracted by some other tune within a day, but Tuesday night has arrived, and my mind still has On a Mission on repeat. I won’t repeat what others are saying: Benga’s trippy bass and Katy B’s soulful vocals make for a brilliant track. Give it a listen.

Buffalo WHR-HP-G300N Review

A few days after installing my new Netgear WNR3500L router, I noticed two problems with DD-WRT build 13527 (documented here). In summary, I found that DD-WRT reboots every 20-90 minutes under heavy 802.11n traffic on the WNR3500L. Rather than waste days or weeks experimenting with different builds of DD-WRT, I decided to fix several problems at once by adding a second wireless access point (AP). By placing a dedicated 802.11n AP upstairs, wireless coverage would improve, the WNR3500L would (in theory) stop randomly rebooting, and my 802.11g devices would no longer create throughput bottlenecks.

Since the WNR3500L had made no use of its gigabit switch during 802.11n transfers, I settled for a simple router, the Buffalo WHR-HP-G300N:

Buffalo WHR-HP-G300N, Fresh out of its retail box

Continue reading

USPS Cracks Down on Online-Generated Postage Dates

Like other small business owners, I’ve learned to expect three things from the United States Postal Service:

  1. A 5-15 minute wait in line
  2. Useless tracking information, and a complete lack of help when packages do get lost (about 1 in every 500!)
  3. Incompetence of approximately half of all postal employees (figure worsens when handed international packages…) Continue reading